Showing posts with label weave. Show all posts

Monday, February 8, 2021

Botanical Table Cloth Journey 3 of 3

This tablecloth project now sits proudly on the dining room table.  We left the 2nd installment journey with the painted warp threads hanging above the laundry room basin tub on a rigged-up trapeze swing. This 3rd and last installment of this journey takes through the weaving process through the finished product.

After carefully taking down the loose warp with reed, wrapping it in the short pieces of wood, I installed the reed, wrapped the various warp stripes across the front beam, and begin to sley the heddles.  It was a weekend project to sley the heddles.  It was really cool to see the wound-up warp tightened on the front beam.


I found online a cool technique to spread the warp.  Basically, I used some junk yarn, doubled up, and WITHOUT using the beater put four rows of tabby loosely spaced, then gently pulled the beater bar and placed the warp.  I then tabbied about an inch of the tea stained warp and hemmed stitched the beginning.  The ends were going to be hemmed later but I wanted to give myself the option of a no-sew hem.  As it turned out, I ended up hand stitching the hem later.

This was my first wide warp.  I learned that my floor loom beater was not properly adjusted.  When I first started to throw the shuttle, it went everywhere!  The floor, popped out the top, I was like a crazy person on the batting field hitting backwards flyers!  I happened to come across a picture of a LeClerc loom, looking for pictures of shuttles.  I thought the shuttle was the problem!  I noticed that the beater bar sat right at the level of the threads.  Not mine!  There was a huge space between the threads and the bottom of the beater  and heddle.  The threads were trying to take the weight of the shuttle. Combine that with the force of a throw, and you end up with a shuttle flying off the trampoline of threads!  OMG!  The beater had a height adjustment! Who knew!  The beater was never set properly!  No wonder I had so much trouble throwing my shuttle.  After correcting all of that, it was a dream!


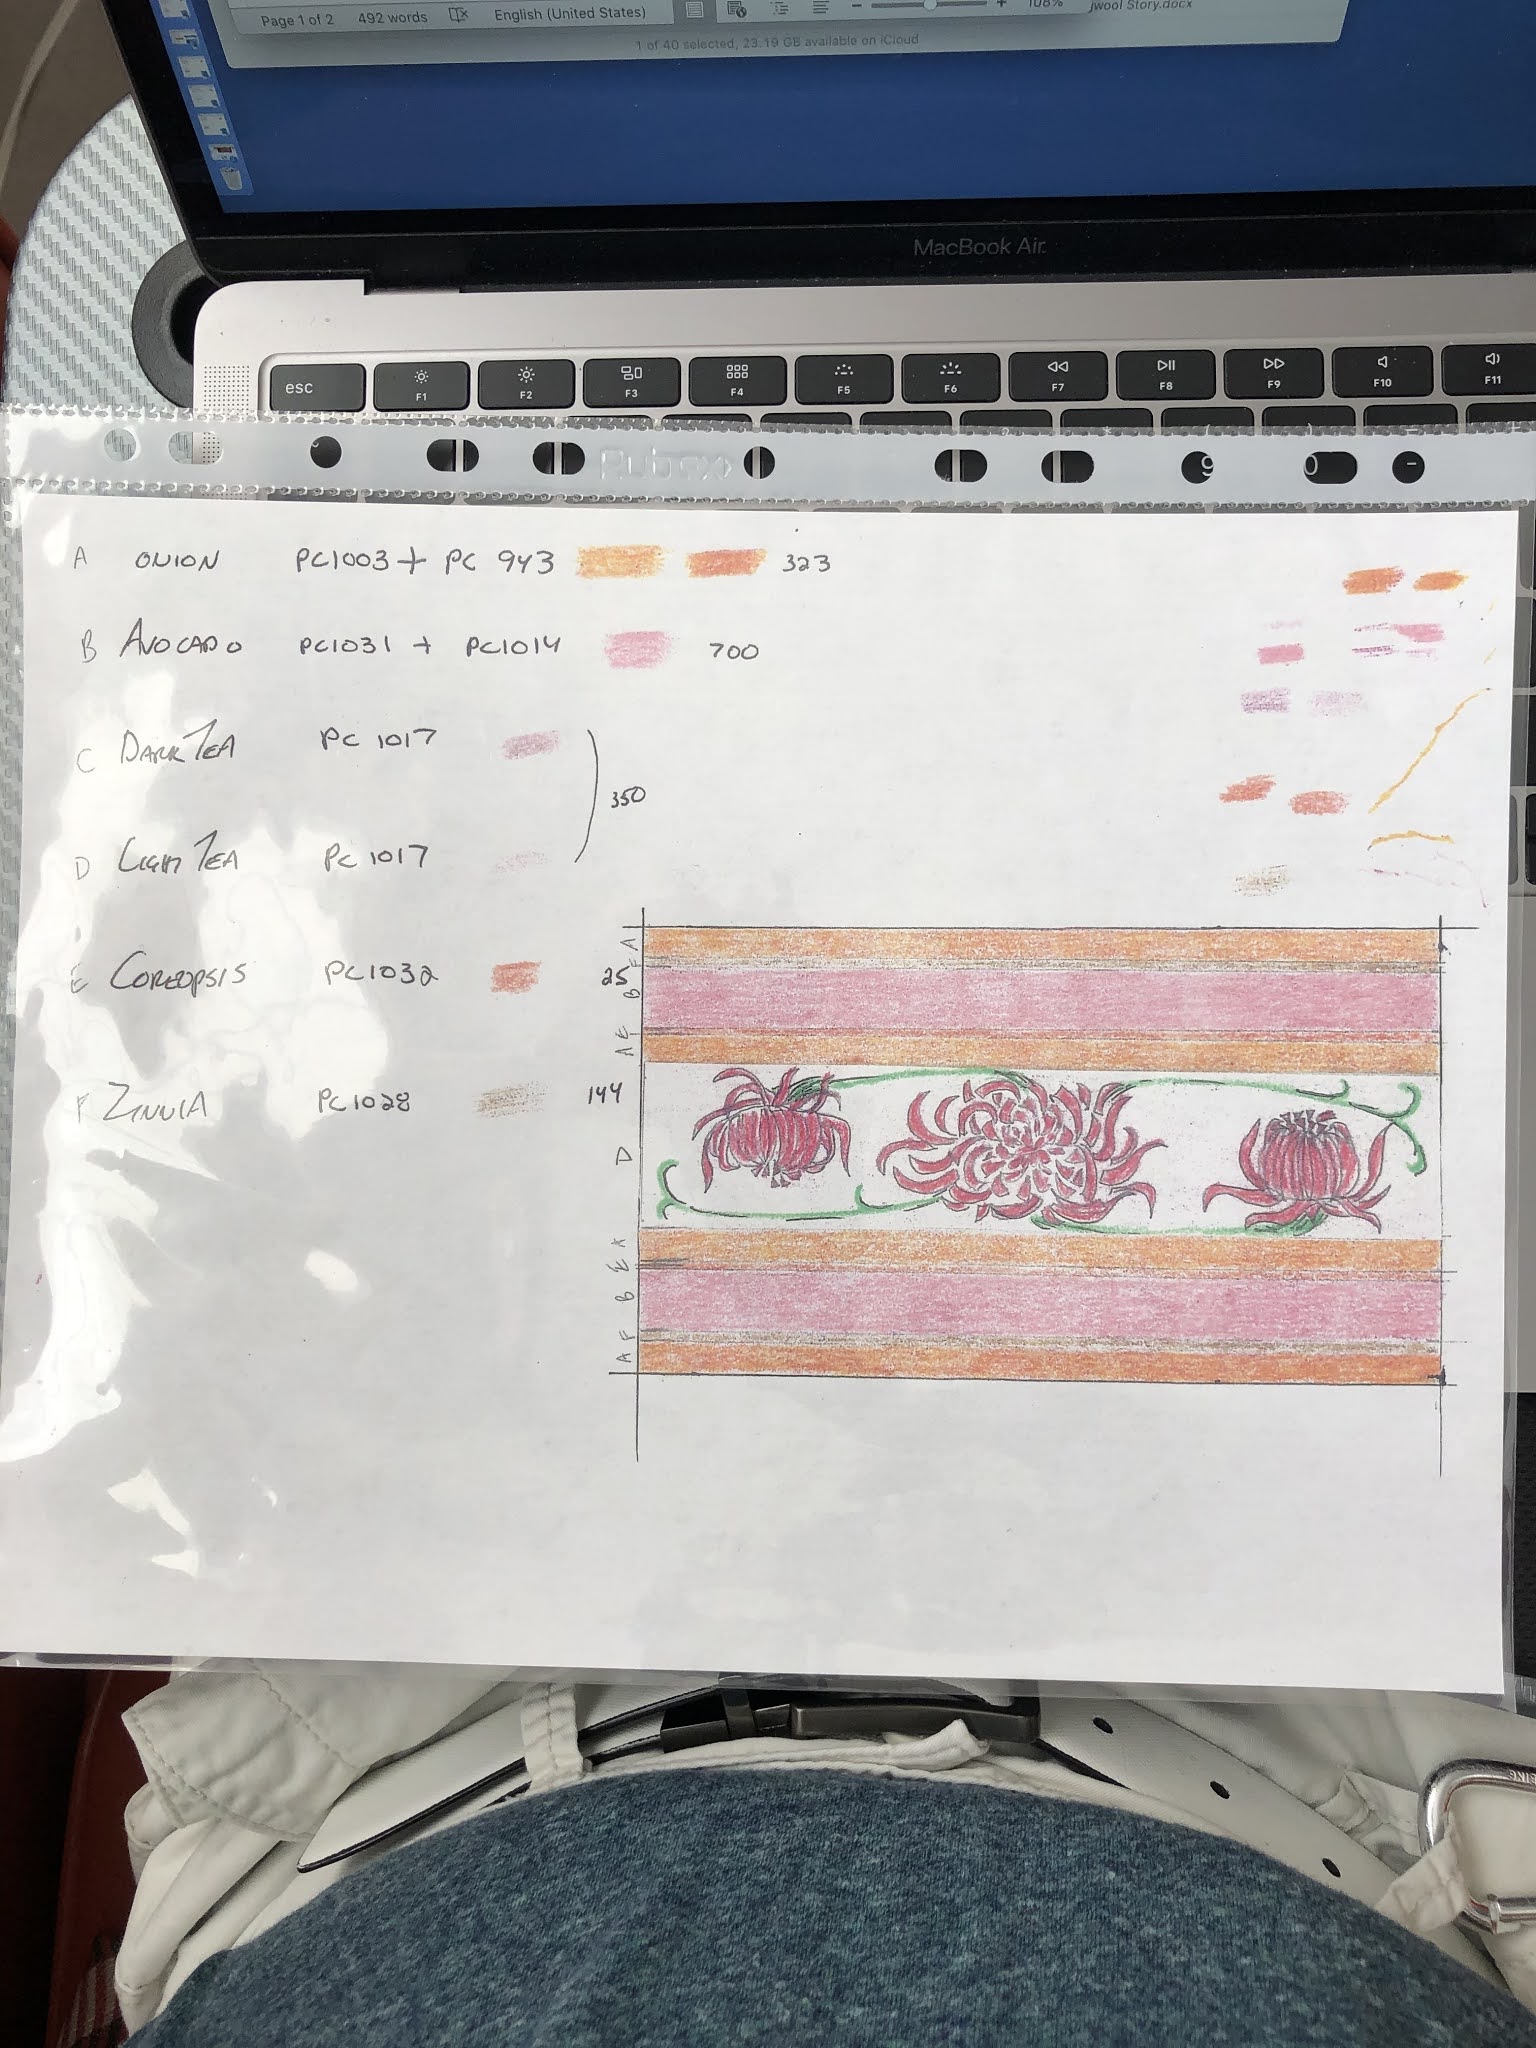
I really really loved the tea stained weft across the various hues of the natural colored warp.  The dark brown weft does show up the pattern more, but I would not change color next time.  It wasn’t for lack of research.  Many online sources suggested a darker weft to show up a painted warp.  And, yes, lest you already think it, swatch, swatch, and swatch.  I do force myself to knit up a swatch first on a knit or crochet project.  I do a little hand-stitched swatch for weaving to test the set.  But, I haven’t been able to muster the patience of warping and doing a loom sample.  Seems like so much effort and wasted thread.  For me, the jury is still out on that one.  Perhaps next time, I’ll dye more thread, risk losing them to sampling, and actually sample first.  We’ll see…

Finished!  It took a little over a year to go from concept, plant seeds, purchase materials, finish the design, gather the dye product, wind the warp, natural dye the warp and then paint the warp, weave, wet finish, sew and press!  From seed to tablecloth with an eye towards natural products, this was an incredibly satisfying journey and project.  I look forward to pushing the bar closer to a more fully “natural” experience.  

On to the next project!

Alex LeClaire


January 25, 2021

Botanical Table Cloth Journey 2 of 3


From dye garden to dyed warp, the next step of this journey was to paint the warp!
  I was really excited about doing this.  I created a full-scale cartoon of the floral pattern that was laid down onto a table and covered with plastic wrap.  

I slayed the reed first using the tea and avocado warps.  Then I laid the warp carefully on one end of the table securing between short pieces of wood using clamps.  The reed and warp were then dragged slowly with much negotiating of the warp, until the warp was smoothed out.  Fortunately, the planned length was just a little longer than the table top, so I didn’t have to reposition the warp during the painting process.  Using Lanaset dyes and alginate thickener the floral design was painted onto the warp.  It was covered with plastic wrap and left to dry and then rinsed the next day.  That was a trip.  I had rigged what looked like a trapeze swing in the laundry room to lay the warp over the basin tub to drip and dry.


The color outcome was incredibly interesting.  As part of the process, I used wool thread to tie knots on a string to keep track of which length of warp was designated for which dye color.  In all cases, the wool dyed much darker than the cotton.  In the case of the onion and coreopsis the color was not only darker but a different color.  The onion on cotton is a beautiful gold, and on the wool it is a rich reddish brown!  The Zinnia on wool looks almost the same as onion on cotton! Same mordant bath, same dye bath, different personalities!

On to the next step!

Alex LeClaire

November 25, 2020

See the next post: Botanical Journey 3 of 3

Botanical Table Cloth Journey 1 of 3

I keep a drawing pad and notebook handy because I never know when inspiration will strike.  If I am tangled in yarn or otherwise engaged, I send myself an email reminder encapsulating the idea.  It was Friday the 13th in 2020 that the idea to create a table runner engaged my creativity.  Shortly afterward, the summer 2020 issue of Shuttle Spindle & Dyepot magazine showed a painted warp.  That picture was soon copied and stashed into my creative bucket folder.  I had done a painted warp with ikat, but just a very bare bones monochromatic version done in a weaving class with HGA in Milwaukee in 2018.  This painted warp had literal though stylized flowers.  I was anxious to do something similar.  In this project, pulled from my wish list queue of techniques and pent-up desires, I wanted to incorporate dyeing, weaving, ikat, and painted warp.


Over the winter through March of 2020 I had planned to initiate a small dye garden from a combination of starter plants and seeds.  I bought a six-pot dye starter garden online that included weld, coreopsis, woad, chamomile, Japanese indigo, and madder.  The planned patio and raised beds had not been done in time to spread beyond this meager dye garden beginning.  As we approach this spring 2021, the raised beds will be done and the dye garden will continue to grow.  But that is another story.  


The chamomile didn’t make it, but the rest took hold.  The seeds were Zinnia.  I had a single Coreopsis plant and two large pots of Zinnia which flowered all summer long and into fall.  It became my ritual to every morning snip off the buds and place them in paper bags awaiting the dye process!  The single madder plant continued to grow and grow.  The kitchen contributed avocado and onion and coffee grounds to add to the potential color mix.  In July, I read True Colors by Keith Recker which included a short report on how a dyer used marigold flowers to 
create a botanical imprint.  I continued to keep the botanical creative fire going by reading various books on natural dye.

In August, sitting in the sun enjoying the quiet and long view across the agriculture fields from the backyard, I finally had an image for the final product for my botanical natural dye desire.  It was going to be a warp painted floral pattern done with brighter commercial colors, on a background of natural dyed warp in pinks and yellows from the natural dyestuff.  The weft was going to be tea stained.  All was planned to be done in cotton.

I try to temper my actions and expressions with moderation.  I don’t always succeed.  Moderation helps me to keep in balance.  I desire to be a naturalist.  I am sensitive to the ecological needs of the planet.  At the time of this creative activity, I was moving towards more naturalist expressions, hence the desire to grow dye plants, use dye plants in my fiber expressions, and move away from planet harmful fiber activities.  My knowledge surely remains incomplete as it is a journey of acquisition.  During this project, I thought the striking colors I wanted to achieve outweighed seeking other natural alternatives for the floral pattern.  I consider myself a naturalist in desire, but in practice I am in transition.  Enough of that, and back to the project.

A cartoon drawing in colored pencil initiated the detail design and plan.  At that point the table cloth had become a table cover since I wanted the width to be no more than my maximum cloth width from the LeClerc floor loom.  The dyestuff had all been weighed. Research indicated that 10/2 cotton would be suitable for a table cloth. So armed with data and Excel, I calculated the maximum warp widths possible with each of the dye materials.  The final design became the iconic inspiration.

My studio roams the house depending on the need.  When it’s cold and I need to dye, it’s a movable table in the back hallway.  When it’s tolerable weather, and I need space, it’s in the garage.  To lay out the warp, and dye the many different dye steps, I needed the space the garage offered, and the longevity of keeping the dye studio available for almost two months. The next step in this botanical table cloth journey was to measure and cut the warp.  This was done on a horizontal warping mill in the garage in late September which was a tolerable and comfortable atmosphere.  Over the Halloween season I spent almost two months in the garage dye studio.  Mordanting came first, then each week was spent using up one or two different natural dyes to color the various warp stripes.


Towards the end of this experience I dithered about using a white or light-colored weft.  I was concerned about what would best show up the painted warp.  I purchased a dark brown cottolin weft for this purpose.  However, I also dyed the entire remaining cone of white cotton in tea to give myself some options.  The tea and avocado sections were targeted for the warp painting.  I mistakenly applied another mordant step, thinking at the time to ensure the thread would take up the dye.  I neglected to research that step, being in a hurry, and ended up removing most of the beautiful pink from the avocado, and a lot of the tea.  A hard lesson learned.

On to the next step!

Alex LeClaire

November 6, 2020

See the next post:  Botanical Journey 2 of 3

Sunday, January 31, 2021

Santa Cruz Cap and Waistcoat - Part 2 of 2

Project Dates:  3/2020 - 7/2020

On to weaving!  The project required about three yards of fabric at twenty-four inches wide.  I wanted to do this on the twenty-four-inch rigid heddle loom, as my thirty-six-inch floor loom was not yet fully into commission.  Four ounces of roving spun into three-ply 12WPI yarn made about 140 yards of yarn which was about half of the project requirement.  

I designed the warp layout using the handspun as accent stripes.  The remainder of the warp thread came out of my stash.  It was a green worsted wool tweed that came from a now extinct New England mill in Massachusetts over thirty years ago.  Who says stashes don’t age like good wine!  The tweed was a wonderful counterpoint to the handspun Santa Cruz velvet!

As I was winding the warp onto the rigid heddle I noticed a distinct difference between the two yarns.  The handspun was very springy and stretchy compared to the milled wool tweed.  I ended up having to keep the different yarns in their own little lark’s head tie groups.  This allowed me to tighten up the Santa Cruz warp more evenly and tensioned closer to the worsted wool tension.


After a bit of color testing for the warp thread, using initially an electric blue mohair, I quickly realized this would not show off the handspun.  I had in the same new England stash a beautiful dark charcoal silk and wool which highlighted the handspun.  I tried different weft setts and finally settled on a slightly more warp faced weave which allowed the handspun to stand out.

On an interesting side note, I left the first inch of blue, and after wet finishing the fabric, really liked the combination of that blue and black which gave a bit of three-dimensional quality to the cloth.  Note to self for a future combination!


On to transforming the white silk into a compatible lining color using Shibori and the same colors as the warp handspun!  That was a very fun technique.  The silk was pole wrapped and I applied the dye using droppers to spot soaked various areas.  I then stood the pole which was only about twelve inches one end into the yellow dye, and the other end into the red dye.  The fabric around the pole looked overdyed.  After rinsing, heat setting, and drying, there was a very beautiful red and yellow patterning, but way too much white, and not enough green.  So, I added all of residual green and yellow dye together and overdyed the fabric!  The result was a very beautiful mottled Kelly green that blended nicely with the woven fabric.


The last step…sewing!  I had to overcome some internal obstacles to put scissor to fabric!  After making and fitting muslin patterns, I cut both the woven fabric and the dyed lining into their corresponding pattern pieces.  The fabric was enough to create a waistcoat and matching cap.  The construction using hand woven fabric was interesting and another learning curve.  All of the edges were sewn first to lock the woven threads after cutting the patterns.  I used the lining to create contrasting welts on the front pockets of the waistcoat.

The overall result and experience were absolutely thrilling and fun!  Though this project uses the required four ounces of endangered species, I am not sure if it technically falls within the Shave ‘Em 2 Save ‘Em guidelines.  However, the prize is not my end goal.  The inspiration and support of endangered species is.  So regardless, I owe this inspiration to and thanks to The Livestock Conservancy.

I felt like the mad scientist working on an alchemical elixir. It pushed my boundaries in a lot of areas.  Research on the web was a key factor.  I can’t imagine doing this thirty years ago without the fingertip access to knowledge and information.  What took me four months as a hobby would like have taken very much longer without ready access to information.  Thank you, internet, and the wonderful world of fiber artists willing to share!


Saturday, January 30, 2021

Santa Cruz Cap and Waistcoat - Part 1 of 2

Project Dates:  3/2020 - 7/2020


Even as a child, I was fascinated by the look of a waistcoat otherwise and more blandly known as a vest.  It’s that third piece of a three-piece suit that adds a little flair of the dramatic.  It’s an accessory that can add color, a little warmth, or just an extra pocket or two! I was seeking inspiration for my second project in support of the Livestock Conservancy’s Shave ‘Em 2 Save ‘Em program.  A waistcoat immediately came to mind!  The idea was born during the winter of 2019-20 and I started construction on my birthday in March 2020!

The first step was to select the breed and find a purveyor of that fine fiber.  After searching the Livestock Conservancy online, I found Santa Cruz and Blue Oak Canyon Ranch.  They sent me a lovely note of thanks in support of their breed.  I was in heaven with a bag full of fluffy fiber ready to revel in the “make!”  The “make” is that joy of being in the moment of executing an activity for the pure joy and satisfaction of it!
My first step, being a project manager, was to write up my intended project which I did in detail.  The color scheme came easy and targeted primarily a dark hunter green with strong accents of Bordeaux red, and a little yellow to add a bit of sparkle and brightness.
The project included a mix of techniques and processes.  The art projects I’ve undertaken incorporate a bucket-list of wanna-try techniques.  This project was going to incorporate Shibori dyeing, spinning a warp, making a tweed yarn, weaving on the rigid heddle loom, and sewing with my hand spun and hand-woven cloth.


I was moving along with all the speed of an excited monkey anxious to play with my new project!  The temporary workspace in the back hallway was prepared for the initial step of preparing and dyeing the Santa Cruz fiber.  I was aiming for a mottled look and three-ply thread in the warp fiber, so I split the two hundred feet of roving into fifteen sections lengthwise, enjoying the feel of every last inch. Then, in superman pose with my hands close together, I slowly slid my hands apart, putting the very gentlest of pressure on the fiber, feeling for that sweet spot when the space between my hands was longer than the staple length, and the fibers started to slide apart.

I had a plan for dyeing the fiber, I did, but, the best laid plans…   I started out fine, meaning all was moving according to the master dye plan!  There were to be nine roving bundles each with one or two colors which I would then spin.  I could have dyed and then blended the roving, but that wasn’t what I wanted to try on this project. So, I dyed all the green as planned.  Then my brain, well, left!  I couldn’t figure out how to implement my plan, despite the picture in front of me!  I was going to dye one roving Bordeaux, two half Bordeaux, and the other half of one of the green roving bundles in Bordeaux.  But the household had just experienced, well, let’s just call it an emotional interruption.  So, instead I grabbed way too many roving bundles and dyed them wholly in Bordeaux. This left me short for a one bundle in yellow.  So, I improvised and worked with serendipity and ended up with a lovely red-orange surprise!


On to spinning!  I was originally going to use up some thrums on the yellow skein to create a tweedy effect for one of the three-plies for each of the targeted skeins.  However, after the serendipitous change of course with the yellow dyed roving above, we put that plan aside.  That would have been one too many fiber techniques thrust into one project, anyway.  I tend to sidle with complexity rather simplicity, a fault, I know.  So, after ending up with fifteen dyed roving bundles, I started to spin.  The colors and roving bundles were split up.  I spun a worsted spinning z-twist ply at 33 WPI.

I tried first a short forward draw, but had much better output and experience with a backwards long draw.  It was also much more fun to spin that way. The single-ply result was amazing.  The texture was completely different from what I’ve tried before.  Squeezing the yarn on the bobbin felt like a sponge.  The plies had a velvety texture that I found visually appealing.
Because of the limitations with the number of bobbins, I spun three bobbins from the roving bundles, and then s-twist plied them together.  Rinse and repeat two more times to end up with the three skeins of yarn.  I did change the color makeup of the last third of the roving bundles, for each of the single ply’s and then plied the last skein.

The next post is on to weaving will finish up this project!

Alex LeClaire

July 2, 2020